So Badger dropped in last night for another session of the wonderful Commands and Colours system. Neither in the mood nor enjoying the time for a lengthy session over the cooker, I laid on one of my favourite quick lash-up meals: pasta carbonara. This time I tried adding a finely chopped fresh chilli (red, to contrast nicely with the green chopped parsley) to the cream sauce at the last moment. Although perhaps a whole chilli was a wee bit too much, it gave the dish an aromatic flavour of mellow fire without any burning aftertaste. Result!
Grub done we turned to the games. Badger wanted to begin with M44 after our recent games of C&C:A, and announced his desire to play the Americans. Having recently posted my thoughts about the Armour Assault tactics card on a thread over at the DoW M44 forums I had only one answer to this: the Germans, and tanks! Thus...
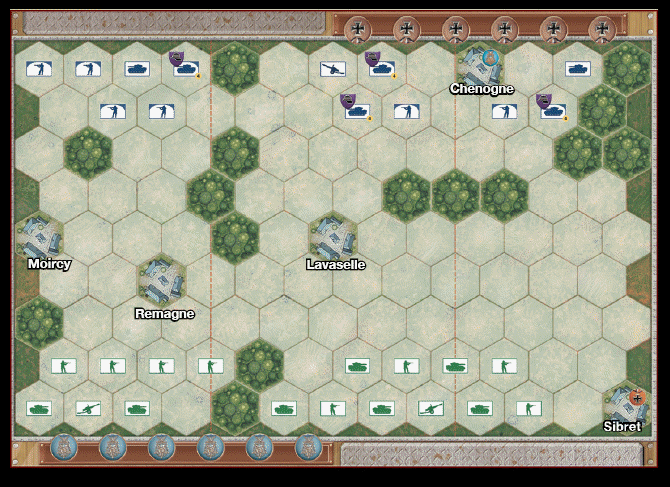
25s Ardennes - Bastogne Corridor, West - Dec 30th, 1944
 Full details can be found here.
I was delighted with Badger's choice of scenario: 6 special forces infantry units; 6 tank units- 4 special forces; and 1 artillery unit against 8 infantry, 7 tanks, and 2 artillery. With terrain open enough for massed armour exploitation, and with artillery ranging-in on units as soon as they crossed their start-line, I could see that this was going to give me exactly the game I was looking for. It did, and how!
We played 3 times in all.
In the first game I was dealt the Dig In card, which determined my opening moves: I spent a couple of turns advancing infantry to forward fire positions so that I could dig them in and get some use out of that pesky card when I ditched it from my hand. I then plumped for a drive up my left flank and moved my centre armour into position. This done I quickly found myself with a reasonable hand for my planned attack while not having any worthwhile options for shuffling around elsewhere. So I faced a choice: I could waste time which Badger might enjoy using to keep me under artillery fire while preparing his own attack; or I could advance. I chose the latter.
The risky part of this plan was that I would be engaging the Americans without immediately being able to exploit my position with my main attack (yep, I was holding an Armour Assault up my sleeve!). I was going to have to pause to develop the attack before I pushed it home. I did have good cards to respond to any counter-attack by Badger, but I'd have to survive first. Survive I did, and my armour did their job. There was certainly some action elsewhere in this game, but the battle was largely decided by my attacks around Moircy and Remagne.
Badger naturally just had to try again. This game was notable for 2 things: it was a much, much more closely fought battle than the first; and more Armour Assaults than you could shake a stick at! Badger did a better job of dictating the flow of play this time, and the battle resolved itself into a mighty armoured clash around the centre with us both level-pegging on victory medals as we approached the endgame.
I played an Armour Assault which generated the full 32 dice of attacks (the most dice you're likely to generate in a single turn in M44: do the arithmetic to see how many units would otherwise be needed to generate 30+ dice in a one turn; then ask yourself how likely you are to be able to order all the required units with a single card). Victory was in sight! Badger Counter-Attacked. The game was balanced on a knife-edge! I Counter-Attacked in my turn, giving me the game. Three Armour Assaults in a row: the cauldron of battle and no mistake!
I took the Americans in our 3rd and final play of this scenario. The lesson I took from the previous games was that the Americans would do better to draw the Germans in then riposte than to initiate the battle themselves. To this end I began with some familiar tentative manoeuvring: throwing forward some infantry as pickets, then concentrating my centre/right armour to threaten the Remagne/Lavaselle areas. As this developed, I fixed on the plan of leaving my right flank temptingly open, inviting Badger to throw his left flank forward towards Sibret. Badger duly complied and his left was crushed by my carefully prepared counter-attack.
I had been hoping to exploit this local victory to make a run for Chenogne and a victory medal that might force Badger to split his forces, but was pre-empted in this when Badger launched his main assault through the centre. With little in hand to respond directly, I was forced to launch my long husbanded Assault up my left, unfortunately with little in hand to ensure any momentum. The battle swung backwards and forwards in a bloody fashion as armour raced here and there in search of that decisive attack. When the dust settled, I had won, but again only just.
3-0
Grins. :)
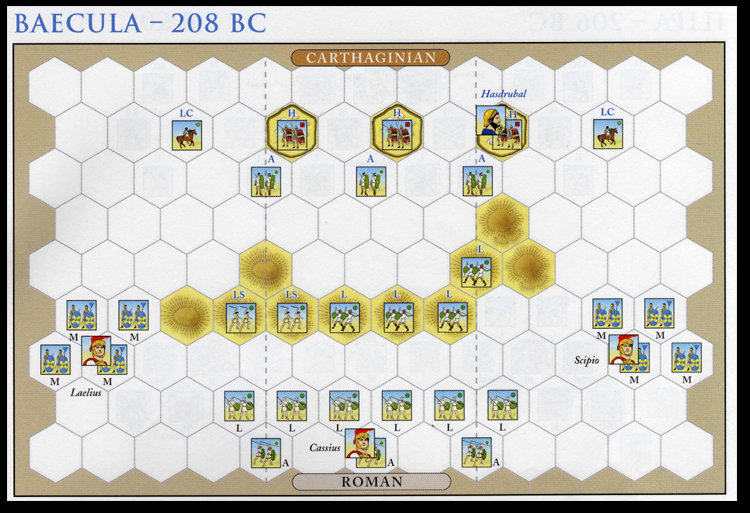
Baecula - 208BC
Three games of M44 down, it was a cinch that Badger and I were going to head back to ancient times to this battle in which the young Publius Cornelius Scipio had proved that the Roman legions could adapt their tactics to defeat the Carthaginians. We'd played it before see, getting in 3 games during our last session, back in October. These had all gone in favour of the Romans, with Badger coming out 2-1 up, leaving me to take consolation from having put up a better show with the Carthaginians than had Badger.
 Full details can be found here.
Random selection left me playing the Carthaginians first, which was just what I wanted: I was keen to put the lessons of our previous games into practice. These lessons were:
- the Carthaginians shouldn't try and hold the hills- Badger had done this in our 1st play last October, and had been utterly stuffed as a result
- the Carthaginians should however make the Romans pay for gaining the hills- I had withdrawn from the hills in good order thanks to evasion, only to realise that I needed at least 1 or 2 victory banners from that phase of the battle
- the Carthaginians need to get their heavy infantry into action as quickly as possible- I had held them back defending the forts until the endgame because I'd wanted to wait to see which on flank the Roman mediums were most committed
- the Carthaginians shouldn't waste their light cavalry.
Pulling off a plan like this one with a mere single leader and a puny 4-card hand proved every bit as difficult as I'd imagined. The 4-card hand coupled with Badger's capacity relentlessly to drive the Romans forward meant that my manoeuvres were typically hasty and/or shallow: long sequences of good cards were hard to build, let alone hold on to. The result was a lot of reactive cardplay in which I was forced to make my key moves as soon as I could without waiting for a good sequence. On top of this the nature of the terrain and my position near my own board edge combined with my sole leader to make coherent battlelines a luxury I could rarely afford to consider.
These difficulties notwithstanding, I did manage to move into and hold together the formation my plan required. Battle raged on around the hills for what seemed like an age as the Roman legionary cohorts ground forward and closed-in on my increasingly cramped lines. Even so the situation looked very hairy indeed as we approached the end-game: I had taken a heavy toll on the Romans, but had only actually managed to kill a single unit. So I wasn't feeling very sanguine about my chances as my heavies and Badger's mediums finally got wired into each other on my left. In fact at one moment I almost despaired of victory.
In the end though luck was with me: I was able to pick off several of the Roman units I had previously whittled down, and my heavies' 5 dice did the business in close combat- I won 6-5. Whew!
As tradition demands, we swapped sides for our final game of the evening. What can I say about the crushing victory that ensued? Erm, it was in the cards. Opening with a Move, Fire, Move, I was able to bring the Carthaginian holding force under fire then engage it in a single turn. Some quick redeployment of Auxilia later and a Line Advance took my entire left and centre cohorts forward in one go. Two turns later, a 2nd Line Advance took my entire army forward in one go. There was very little that Badger could do after this. I won 6-1.
4-1
Grins :)
A satisfying margin, with the added delight of opening and closing the session with crushing victories by the heavy metal masters of their respective periods. But before I get too smug, I really do have to point out that the final outcome does flatter me a bit: 3 of those games were so closely fought that the whims of chance need only have been tweaked slightly in Badger's favour for the result to have been very different. Still... Heh! ;)
4 comments:
Welcome back John. Still reading :)
Looks you gace Badger a good sound thrashing fro a change eh John? Im not familiar with either game system but your tactics as the Carthaginians were very apt. For the Carthaginians it was also about pining the Romans in place with their light units while the heavies manouvered into position for the killer blow.
Once or twice (at Cannae for example, it was even a case of the light troops manouvering, rather than pinning, the Romans in place for while the heavies lay in weight.
So good, sound AND historical tactics for the Carthaginians there. Its interesting how in all the reports you've made using this game system so far, the side that uses appropriate "historical" tactics (or as close as the game system will allow) tends to come out on top. Well done those designers.
To clarify what I meant by "manouvreing" (thats what light troops do after all) I was referring to how the Carthaginians would use feigned retreats to "draw" the Romans in to where their heavies lay in wait rather than having the heavies march to the Romans who had been trapped by the lights.
Come to think of it, this is what happened during that famous ambush (whose name escapes me just now) that you and badger wargamed in october.
i would just like to say thats pretty accurate and not a nice read. but we need to move onto other scenario's now on C and C. will c u soon john
Damm you Romans!!!!
Post a Comment